Ditchling Common in December

I hadn’t been to Ditchling Common in December before and was surprised to see frost and ice on the ground on a day when it must have been about 10 degrees warmer in Brighton and which still hadn’t melted by sunset. The light faded quickly in late afternoon and just as I was leaving, I caught sight of bare stalks of cow parsley, devoid of seeds, standing out graphically against the winter sky.

331_ditchling_43_web

Canon 5D Mark II EF 100 mm f2.8 macro L lens, 1/100 @ f2.8 ISO 200

The sun had set leaving a band of orange against the horizon but an aperture of f2.8 created an orange disc behind the silhouetted cow parsley giving the appearance of a setting sun.

Publicity Shots for Brighton band ‘This Modern Life.’

The gloomy light and overcast sky of a December day provided excellent, soft lighting conditions for a photoshoot of this Brighton band. They wanted to be shown in a contemporary urban setting, reflecting the way we live now, so I took them to the derelict land where the Black Rock swimming pool used to be.

330_modernlife_75_web

Canon 5D Mark II EF 24-105 mm f4L IS 1/160 @ f4, ISO 100, 24 mm

The place has an extraordinary atmosphere, with enclosing walls covered in graffiti; water puddles full of seagulls; a treasure trove of abandoned objects, the detritus of city living; distant views of the tops of grand regency buildings and the strong graphic lines and shapes of Brighton Marina’s concrete architecture.

330_modernlife_51_web

Canon 5D Mark II EF 50 mm f1.4 1/640 @ f1.4, ISO 100, 50 mm

The mean, moody look of the band members owes less to their emotional state and more to the fact they were freezing cold. It was blowing a gale but thankfully, as I hate being cold, I had wrapped up in lots of layers and a thick coat.

330_modernlife_52_web

Canon 5D Mark II EF 50 mm f1.4 1/800 @ f1.4, ISO 100, 50 mm

 330_modernlife_32_wip_web

Canon 5D Mark II EF 50 mm f8 1/500 @ f1.4, ISO 800, 50 mm

 330_modernlife_96_web

Canon 5D Mark II EF 50 mm f1.4 1/200 @ f1.4, ISO 100, 50 mm, 580 EX speedlite

I used three different lenses on the day including the Canon 100 mm L IS macro but I mostly used the 50 mm f1.4 which is very fast and perfect for low light conditions. I often use it with my 580 EX speedlite to provide some fill flash which helps to make the subjects stand out from the background.

Using a Plastic Holga Lens with a Canon DSLR

This is a shot I took the first time I used a Holga lens with my Canon 5 D Mark II. Some people like using a Holga for the vintage photo look it gives to images; I like it because of it’s quirkiness – the way it give’s a new take on familiar things.

322_dungeness_80_wip_web

Canon 5D Mark II 1/80 sec, ISO 400, 50 mm

It’s made of plastic, has a fixed aperture of f8, focal length of 50 mm (60 mm on APS-C sensor cameras), and limited focusing.

It gives a lo-fi, retro look, with strong vignetting (especially with a full-frame camera) and softer focus towards the edges. With this lens, you can use a DSLR rather than film in a Holga camera – with all the advantages of digital but you’ll need to use manual settings.

Good news…it’s very light and it’s cheap! At least, relatively compared to most camera equipment – I’ve just paid £20.90 for one on Ebay.

322_dungeness_99_web

Canon 5D Mark II 1/320 sec, ISO 400, 50 mm

Macro Wildlife Photography

Being thoroughly fed up with the chilly weather conditions last month which precluded my excursions into the country for macro photography, I made the decision to go out on 22 June whatever the weather. When I set out, it was raining but I parked the car at the side of the road from where I could climb over a stile and follow a footpath leading to Devil’s Dyke.

I never made it over the stile – the grass verge was teeming with life, I presume, sheltering from the rain and moving about a lot less than in fair weather conditions.

The grasshopper below was shot using a tripod – I often use Wimberley clamps attached to it at one end and the subject’s perch at the other to lessen movement caused by the wind but in this case, the grass blades were near ground level and sheltered by the other vegetation.

302_dyke_3_web

Canon 5D Mark II, 1/160 sec at f 7.1, ISO 800, Canon 100mm f 2.8 Macro USM lens

Convert to Black and White using the Channel Mixer

I find this one of the simplest and most effective ways of converting a colour image to black and white.

First, open your photo and then add a Channel Mixer adjustment layer by clicking on the icon at the bottom of the layers palette.

picture-17

Select Monochrome and adjust the percentages for RGB.

There is a common misconception with this technique – the RGB percentages must equal 100%. The truth is they do not need to equal 100%, they can actually equal whatever you want them to be, since the main goal is to make sure the photo looks the way you want it to look.

When I have used this method before, I usually start with the following settings:

R: 70% G: 30% B: 5%

From there I adjust the settings until the photo looks the way I want it to.

picture-9

In this case, I used R: +88% G: +29% B +4%

Adjust the percentages until the photo looks good, don’t worry about great, we’ll get to that in a moment. You can also adjust the constant percentage to lighten or darken the photo. In this case I darkened the photo by setting the constant to -2%.

125_warwick_43_wip-2_web

Now you’ve got it looking as good as you can, use a Levels adjustment layer to check where your lightest and darkest tones are in the image. If it’s looking rather flat, tweaking the levels can give the image more punch by increasing the contrast.

Create the layer by choosing from the same drop-down list as before, shown in the first diagram above.

picture-12

The Levels diagram above shows the tonal range of an image with 255 different tones between 0 – pure black and 255 – pure white.

The tones in my image were well distributed so I didn’t make any changes at this point but I did some fine tuning using a Curves adjustment layer to increase the contrast.

picture-14

I pulled upwards in the centre of the line to brighten the mid-tones, downwards at the bottom to further increase the darkness of the darker tones but I pulled the top of the line back a little to avoid blowing out the highlights which are bright enough.

picture-15

The final image

LEVELS

Read more: http://www.digital-photography-school.com/digital-black-and-white#ixzz1Ob07PnYz

Artists Open House Exhibition 2011

news060511anews060511b

Colleen will be showing her work at Eclectia Gallery which is venue 32 on the Kemptown Artists Trail as part of the Artists Open House exhibition. Her exhibition features the ‘Underwater Flower’ series and recent Brighton ‘Street’ photography.

Address: 3 Mermaid Walk, Brighton Marina, BN2 5W
Open all four weekends in May 11am – 6pm
Tel: 07734593393
info@eclectiagallery.com
www.eclectiagallery.com

Eclectia Gallery in Brighton Marina showcases talented local photographers and provides an affordable studio hire space to help local photographers develop their studio work without having to pay for equipment. Exhibiting as part of AOH you can find the work of Owner Kirstie Blake, as well as regular exhibitors: Colleen Slater (macro Flowers & Brighton), David Dixon (Brighton Scenes), Stephanie Anjos (Travel), Fran Walding (Wildlife), Strat Mastoris (Architecture) and Stephen Batey (B&W).

news060511c


Macro Bluebells

One of my favourite places for macro photography is Mill Hill Nature Reserve which overlooks the Adur valley just north of Shoreham in Sussex. It’s an unimproved chalk grassland, maintained by the South Downs Conservation Board – a rare and diverse habitat of nearly 35 acres, only three percent of the original chalk grassland remains on the South Downs. Much of the grassland habitat has been lost by the lack of grazing animals over the years which keep the scrub at bay, allowing the indigenous flowers and insects to flourish.

I took this shot at the end of an unusually warm April day with the sun going down.

294_millhill_43_wip_web

Canon 5D Mark II, Canon EF 100mm f2.8 Macro lens, 1/800 sec at f2.8, ISO 400

Diving with the Ewa Marine U-BXP 100 SLR Underwater Camera Housing

I needed equipment for underwater shooting during my stay with Coral Cay Conservation in the Philippines so I carried out thorough research into the available options prior to the trip.

The main considerations were cost, weight (airline baggage allowance of 20kg) and image quality.

I have Canon Eos 350D and 5D Mark II cameras with 100mm f2.8 macro, 16-35mm L f2.8, 24-105mm L and 50mm f1.4 lenses and a 580 EX speedlite.

The Ikelite hard housing for the 5D Mark II is £1200 with around £300 extra for two different ports to fit different size lenses and a further £340 for an 8” dome port should I want to use a 15mm fisheye lens. A strobe light and fittings would add from about £460 upwards.

The various options are shown below.

2011040100051  201104010005

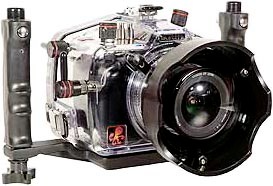
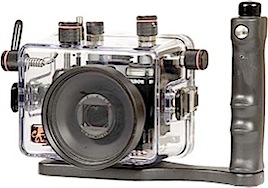
Ikelite 6871.02 hard housing – 3.25 kg without port – 3.6 kg with port

201104010009


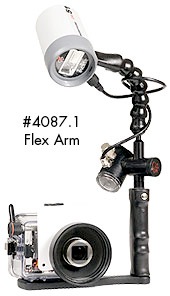
Ikelite DS51 Strobe + 4087.1 Flex-Arm + EV Controller 0.6kg = £460

The total cost for this kit would be at least £2300 with a weight of 4.2 kg. Perhaps I could go with a smaller camera and housing but it would mean purchasing a new camera and the kit to go with it. I considered the Canon Gl2.

201104010010

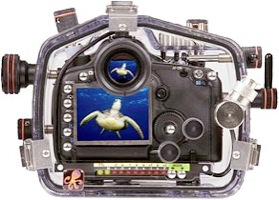
Ikelite 6146.12 housing + Canon G12 camera + 2GB SD card = £ 999.99 from Cameras Underwater at www.camerasunderwater.co.uk

Camera – 0.4 kg housing with handle and camera installed – 2.7 kg

The housing comes standard with an optical grade glass flat port which allows full use of the camera’s zoom range without vignetting. A flash diffuser is included to improve image quality when using the camera’s built-in flash to illuminate the subject.

Special conversion circuitry built in to the housing provides Canon ETTL exposure connected to any current model Ikelite DS Substrobe. The camera controls the Substrobe’s output for accurate exposure.

This option would be 1.5 kg lighter and cost up to £1300 less if the internal flash was used rather than an external strobe but I would need to add the cost of additional lenses. I would be able to shoot RAW.

Canon Powershot D10 compact camera – 190 g – £226

201104010012

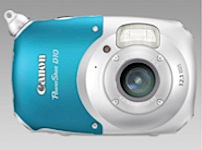
The simplest, lightest and cheapest option was to go with an underwater compact. The Powershot D10 had some excellent reviews:-

http://www.whatdigitalcamera.com/videos/reviews/344032/waterproof-digital-cameras-group-test.html

Ewa Marine U-BXP 100 SLR Camera Housing – 1.3 kg – £350 – Cameras Underwater

201104010015

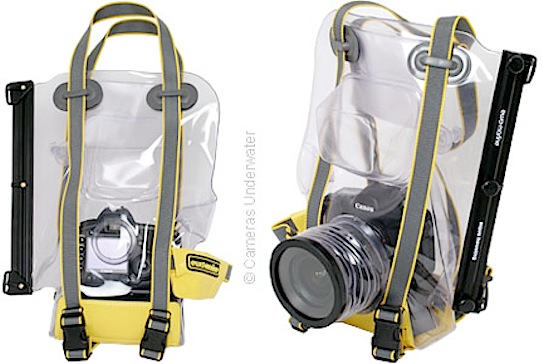
After hours and hours of research and head-scratching, I finally chose this, the flexible, Ewa Marine, waterproof bag, with which I could use the kit I already had. Not too expensive, not too heavy….and unfortunately, not too simple, as it turned out! There are different versions of this bag, this is the most expensive one which I chose so I could use the 580ex speedlite and also my 16-35 mm lens.

The U-BXP 100 is a special version of the U-BXP housing. It has a wider front glass and allows in combination with the C-A 77 adapter (supplied with the housing) and C-A 82 (available as an accessory from your dealer) adapter the use of lenses with a filter thread of 77 and 82mm. This means you can use your professional digital SLR camera like the Canon EOS 1D, 1Ds Series as wellas the Nikon D1, D2H, D2X, D200 and similar cameras, with most of the professional wideangle lenses currently on the market. This enables you to use wideangle lenses with a focal length of 16mm (full format chip) without problems. All lenses used with this housing must have a internal focus. Lenses with a smaller filter diameter can also be used in this housing as long as they have internal focus. You just need the right step-up ring. The autofocus adapter (AV110) is not included in delivery as it is not needed for this housing. If the optional BF1 lead weight is inserted into the housing, underneath the camera, it becomes even easier to reach the maximum depth. Experienced photographers have confirmed, that the auto focus and flash both continue to function perfectly. As you descend, the air is pressed into the camera. Due to this, the pressure inside the housing willremain the same as the surrounding water pressure. The dive must be started with a suitable amount of air inside the housing.

Conclusions

The bag is waterproof to over 30 metres – not a drop got through the seal and it enabled me to use the kit I had already. It is sturdy and seems hardwearing for a plastic bag but there were some problems and I found it frustrating to use. Not using a battery grip, I found the LCD screen of the Canon 5D Mark II did not line up with the viewing ‘circle.’ Crucially, the rigid seam of the bag lined up exactly where my finger needed to feel the shutter button so it was impossible to have much control. Successfully half- pressing the shutter for auto-focus or fully pressing to take the shot was rather hit-and-miss and I’m not sure I could have improved with practice. The design of the straps seems illogical – there doesn’t seem to be a way to use them to comfortably hold the bag in place, if dropped it could float away. I needed to attach different weights to the bag but it wasn’t possible to clip them in place. I had to laboriously undo each strap before threading the weights on.

The other people I was diving with used underwater compacts and I would say they took far better shots than I did and they certainly enjoyed taking them more. I was taking part in coral reef conservation and was there primarily for that purpose so the opportunities for me to dive with thephotographic equipment I had were limited. Those with the compacts were able to take them on every dive. Next time….